My Oscars: If I Had to Choose Just Three Blogs...

Monday, February 28, 2011
There's a ba-zillion decor blogs, and so many creative, inspiring, and instructive ones. You can't read them all. You have a house to stage! 

These are my picks for the three blogs I would suggest to a homeowner putting her home on the market and wanting to stage it. If you think it was easy to narrow the field to three, you're crazy. My criteria focused on how seriously helpful the blog would be to someone relatively new to the design/decorating/staging process.

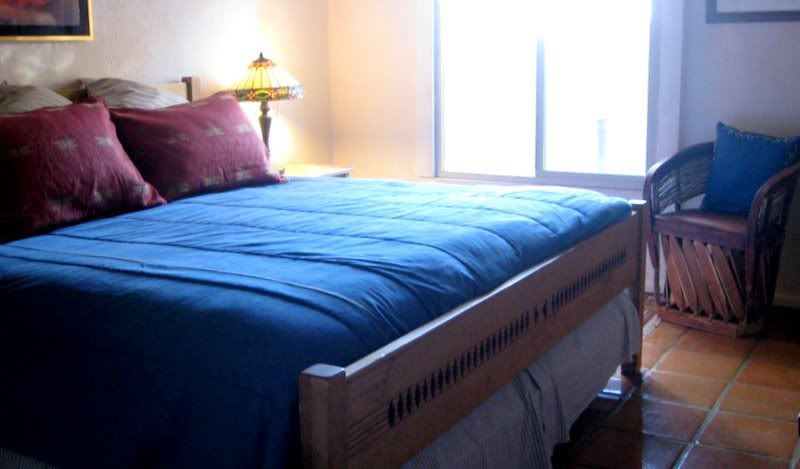
Laura Casey designed this craft room for a family in Charlotte, North Carolina. The home is one featured on her blog.

My choices had to be practical in a nuts-and-bolts way.

It also had to be easy to read -- clear, concise, upbeat, and positive.

In no particular order, as they say on the Academy Awards...

Color Me Happy

Maria Killam personifies my idea of what a design blogger should be -- a teacher who is candid, intelligent and stylish. I always learn something from each post. And she doesn't dumb this stuff down. If you are one of her many devoted readers, you already know she's been blogging since 2008. That means there's an online archive you can use like a textbook for color selection when it comes to paint, furniture, textiles, accessories, tile, carpeting, appliances, or whatever. 

Maria Killam gets my vote for being the most helpful blogger 
when it comes to picking paint colors -- a crucial decision for someone 
staging a home for sale. Can you tell she's passionate about color? 
Photo: Jennifer Houghton
Maria's talent is seeing colors and helping us see them, too.

She explains concepts like the importance of undertones, the difference between muddy and clear colors, the irrelevance of the color wheel, and the ambiguity of warm and cool color classifications.

She uses photos judiciously to illustrate complicated design decisions. Somehow, she's able to reduce puzzling dilemmas to solutions that work. She's Vancouver-based, but travels to do workshops and color consultations and to study. She's engrossed in the industry.

Maria puts her emphasis on timeless designs 
that can be tweaked over time. Photo: Macy Yap

What else I like about the award-winning Color Me Happy is that Maria posts regularly, not sporadically. The site has a girly vibe to it, but she's never gushy or redundant. There are no typos or multiple exclamation point series here, like this!!!! Which drive me nuts.

Although she's light-hearted, she's very serious and ambitious about her career, and she shares that side of her life with us, admitting her own foibles along the way. So refreshing.

Although many of her color choices are bold for home staging, her love of color is contagious. Hang out with Maria and you're bound to get over your fear of choosing colors for your staged home.

Young House Love

You gotta love these guys. Maybe you already do.

They're devoted to doing it themselves, and although they're feeling their way, making it up as they go along, they have more creativity and energy between them than most of us have in our left big toe.

They've spent the past few years turning a simple ranch house in Virginia into a one-of-a-kind home anyone would want. Their house sold in two days after listing with MLS, at a price they liked.

Now they've moved and are feathering their new, bigger nest, and taking us all along for the ride. They make all the work they do look like fun.

What you'll learn from reading their blog is a confidence that "if they can do it, I can do it." It's that mindset that is necessary to the success of DIY home staging. Without it, you'll never begin.

From these two, you'll learn that there are no hard and fast rules about how to update a room, choose a rug, arrange bookshelves, organize a closet, or save on remodeling money.  
 
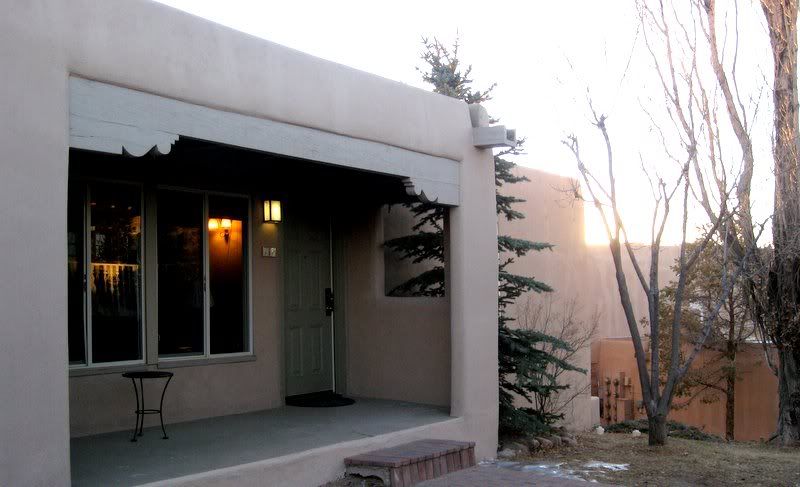
This is the deck of Sherry and John's home on the Florida Panhandle. 

Although they can be wordy, all the details are there, and all the jokes and tangents and photos and links and videos as well.

Sherry and John give you all the nitty-gritty on each and every project -- where they bought the supplies, how long the project took, what mistakes they made and how they corrected them. Hey, over 9,000 Twitter followers can't be wrong.

Their site's won numerous awards. And Nate Berkus and Rachael Ray have put them on their shows, so they are officially DIY celebrities.

I regularly visit Young House Love, and always get my hit of imaginative decorating that doesn't break the bank.

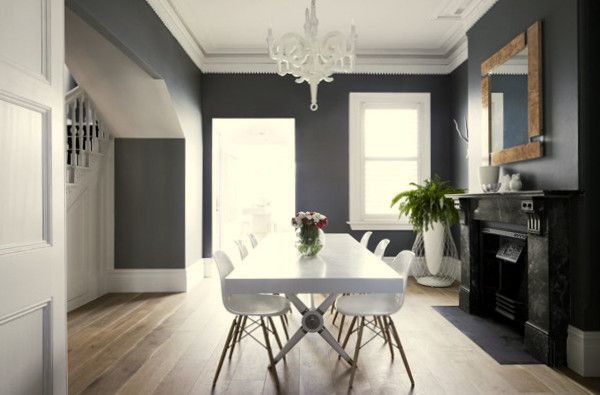
Laura Casey Interiors


What I appreciate most about Laura Casey's blog is the eye candy she loads into it. But there's more than pretty pictures here.

An interior designer with impressive credentials, Laura seems to be at home in all kinds of circumstances -- doing budget remodels, hobnobbing with the design world honchos, tackling an extensive kitchen refit, updating a living room, sprucing up a foyer, or just kicking back in home base, Charlotte, North Carolina.

I also like that she doesn't waste a reader's time with superfluous writing.

Each post is centered around a single topic. Her writing is to the point. She doesn't spend words when a picture will do, and I like that. She's obviously knowledgeable about history, architecture, and gardening as well.

The best part is that Laura's generous in passing along her understanding of trends, history, art, and good design.

Her taste is impeccable, just the kind of person a beginner wants holding her hand.
   
But it's really the carefully chosen photographs that will be the most help to a home stager who's educating her eye about proportions, colors, styles, furniture placement, fabrics, window treatments, lighting, accessories, or floor coverings.

Some of these shots take my breath away!

Not all of Laura's selections will be appropriate to home staging. Remember that good style is good style no matter what era or budget. You'll just have to edit the rooms down to their stage-worthiness.

Let Laura sharpen your eye on your way to creating a marketable home. Thanks, Laura, for sharing so much of what you've learned and what you do.  Photo: Sean Busher Photography, Inc.

Get the look, get the book

In my eBook, DIY Home Staging Tips to Sell Your Home Fast and For Top Dollar, I give you helpful  ideas and inspiration to stage your own home, including links to more professionals like the ones featured here. Download today and start today to make your home stand out from the competition.    

How to Faux Finish A Plastic Flower Pot

Monday, February 21, 2011
 What looks like a cast concrete or stone planter is really just a plastic flower pot painted to 
resemble something much more hefty and pricey. A planter like this one will look 
great in a staged home, either indoors or out, holding real plants or silks.

Take one cheapo plastic flower pot and turn it into a classy cement planter. Magic? No, it's just paint, and you can do it yourself, even if you've never done faux finishes before. Don't let the French word scare you.

Here's my Step-by-Step for creating the flower pot pictured above. It's a quick and easy DIY project.

Gather materials

Doing this project outside is best. The paint will dry more quickly with better air circulation, and you'll have fewer surfaces to protect. However, if it's above 70 degrees, find a shady place or wait for a cooler time because the paint can dry too fast. Here's what you need.
  • Work surface and drop cloth
  • Plastic or resin flower pot, preferably one with a thick top edge
  • Gloves
  • Two rags
  • Medium-grade sandpaper
  • Paint stick to stir paint
  • Paintbrush, not an expensive one
  • Plastic bucket, 1-quart to 1-gallon
  • Screwdriver or painter's 5-in-1 tool
  • Latex primer like Zinser or Kilz
  • Natural sponge
  • Cardboard, or 3 disposable paper or foam plates, or pieces of aluminum foil
  • Three latex semi-gloss or satin housepaints or craft paints (medium or light grey, white, and black)
  • Optional: clear sealer (either spray paint or liquid)

Prepare the container

Cover your work surface with a dropcloth to protect it. Using a dry rag, wipe the container to remove any loose dirt, including the inside. Put on your gloves. Sand the container's outside surface.
 
Sanding will give the surface a "tooth" to help paint adhere better. As you can see, I am recycling an old container. The container you faux finish needn't be new, but it needs to be clean.

Paint with primer

Invert the planter and start at the bottom. Brush on paint. It will dry quickly, especially if you are working outside and it is warm or windy.
 
  If the planter has feet, paint all sides to be sure none of the old color shows when you are done.
Paint the bottom half, and the underside of the top lip before you set the planter right side up.
Next, paint the sides with the planter in an upright position. Use your gloved hands to 
rotate the box from the top lip.

 Paint inside the top edge, which will be visible even after the planter is filled.
 Your primed planter will look like this. Don't worry about coverage. You're just making sure the next coat sticks. Check for drips and runs before the prime coat dries.

Apply a base coat of grey

Follow the same steps as the prime coat, starting at the bottom when the planter is inverted.
Your planter should look something like this when it has an even coat of grey as a background.  

Sponge on white paint

Dampen the sponge. Pour a small amount of white paint into the plastic bucket. Add an equal amount of water and stir. For my planter, which measured 15 inches tall, I used less than 1/4 cup of white paint for sponging. Dab the sponge into the paint and then dab most of the paint off onto a piece of cardboard, disposable plate, or aluminum foil. Practice on the interior of the planter until you get the feel of sponging to simulate texture.
 
  Lightly dab paint onto surface, moving the sponge around to create a random pattern. I used a piece of aluminum foil to remove excess paint from the sponge.
Overlap the sponging pattern, and leave some areas grey.

Apply black wash

After the entire surface is randomly sponged with white, wash your sponge well and put it away. Wash the plastic bucket, and use it to mix a small amount of black paint with an equal amount of water, about the same amount as you mixed of white paint.  Brush the entire painted surface with the diluted black paint. It should settle into any groves and crevices. Lightly wipe the surface to remove most of the black wash. It should give the planter a slightly aged look. 
 Have a rag ready to wipe off the diluted black paint. 
 
 The wash will look like this when you brush it on. 
Don't worry about coverage, but make sure black paint gets into crevices. 
After the black wash is wiped off, your planter will have a softer look.  The paint should dry quickly.

Add splatter

This can get messy, so protect any adjacent surfaces. Using the same black wash, load your brush with it, and then remove most of the paint. Rap the brush sharply against a screwdriver or 5-in-1 tool to make a splatter pattern of black paint on the planter. Rotate the planter to do all sides, including inside the top edge. You may choose to position the planter on a cardboard box and walk around it rather than rotate it. Aim for a random but all-over splatter pattern. If some drops are too large or look more like streaks than dots, use a rag to dab them away while they are still wet.
Practice your splattering technique on the inside of the planter before you do the outside. 
Keep the brush at least a foot away from the surface. 
Your planter should look evenly splattered when you are done. You can do a lot of
splattering or a little. I can imagine two of these, each with a topiary on either side of a front door.

It's optional to cover your work with a coat of clear sealer. It can give the paint an extra layer of protection if used outside, and it can add a subtle sheen to the finish. I sprayed a coat of clear satin finish on this planter to make it look more granite-like. 

This is a resin pot that I faux finished with pinkish undertones. 
You can choose natural stone colors that work with the colors of your staged home.

Ordinary plastic flower pots for indoors are perfect for faux stone finishes.
Just prime, sponge and glaze.
 Even glass vases can be converted into stone planters. Look for classic shapes like this one.

I paid just $8 each for these planters at Big Lots. They were plain brown plastic. One great thing about plastic pots is that when you move, they're lightweight so they're easy to take with you.


This is why I suggest using an old or inexpensive paintbrush. The splattering will destroy it. The side of my brush is all banged in and the bristles are splayed. Save your Purdy brush.

Get the look, get the book

You're just a few steps away from creating an impressive but thrifty staging prop for your home. And help yourself to more ideas and instructions for DIY projects in my homestaging eBooks. Surprise yourself with what you're able to do to stage and decorate your own home!

Strategies for Staging a Vacant House

Thursday, February 17, 2011

You may have inherited it, moved from it, or bought it to flip.

There's a variety of ways people come to the project of staging a vacant property, and the project comes with its own challenges.

If that's your situation, it's important is to get creative. Here are some pointers to help you do it right.

Unless you have deep pockets, you'll need to marshal all your inventiveness.

Gather ideas from online, model homes, shelter magazines, and retail stores.

Get current with what people expect in that neighborhood and that price range. Talk to a Realtor early in the game.

Rental furniture is an option, the bugaboo being you don't know how long you'll need it, so budgeting is tricky. Alternatives are borrowing from family or friends, loaning the house some of your own furnishings, or buying some essentials that will work for your own home when the property sells.

Sources for cheap furniture are garage sales, estate sales, thrift stores, Craigslist, and curbside. All these approaches work best if you have the kind of schedule for it. And luck. You have to be in the right place at the right time. Start looking now, and be persistent.

Remember that furniture doesn't have to match. Gone are the days of matching suites for dining rooms, living rooms and bedrooms. Thank goodness! Paint can be your unifier. A large area rug (or a carpet remnant the carpeting store will bind on the edges for you) can tie together an eclectic furniture mix as well.

The kitchen and the baths in an unoccupied house are easy to stage. They usually don't require furniture, only props. So concentrate on setting the right tone in these rooms, and they can carry the house. Declutter, clean, and then add freshness -- fake fruit in the kitchen and fluffy towels in the bath.

Use your imagination to make the most of what 
you have available. These two etagere units stand in for 
traditional nightstands and make 
the room look important and full. Photo: Apartment Therapy.

Decide on a simple and singular color scheme for the entire house. Once you have your color palette, hunting for furniture and accessories will be so much easier. You'll be able to experiment with different arrangements on-site until you've tweaked it just right!

What not to ignore: upholstered furniture, window coverings, wall art, and lighting fixtures. These are the elements that make a difference. Make them large so the home feels luxurious, and make them look appropriate to the style of the home.

Stretch your budget with DIY projects, including those essential window treatments and works of art. Other frugal ways to fill up space and make a style statement are paint-worthy bookcases, occasional chairs, and end tables, all of which are waiting for you at your neighborhood thrift store.

Keep in mind that spaciousness is good, what buyers want. You needn't fill every room with furniture. Every bedroom doesn't require a dresser and every living room doesn't need to seat eight.

Work with your Realtor to locate furnishings. She may know people who have too much furniture in their home on the market, people who could sell or loan you some of what you need.

Large art or mirrors will fill empty wall space and large plants 
and oversized lighting fixtures also help. 
Modern furniture looks more natural in a
sparsely furnished room. Designer: Greg Natlae 

I wrote more about the benefits and pitfalls of marketing a vacant house here.

Read about what the essential pieces are for each and every room in my eBook, DIY Home Staging Tips to Sell Your Home Fast and For Top Dollar. Download now and begin your staging today.

50 Reasons I Love My Husband

Monday, February 14, 2011
The Man: He likes the outdoors, but he won't hunt or fish.

1. No matter how crazy my ideas sound to him, he always encourages me to do what I want.
2. He smells great, even when he's a mess.
3. He's quiet as a mouse in the morning so he doesn't wake me.
4. He's quiet all day long.
5. We never lack for conversation.
6. He's generous.
7. He's loyal.
8. I know I can trust him with my heart.
9. Even his corny jokes are funny.
10. He never says, "What's taking you so long?!"

 The patriot: Ready for the July 4 parade in the 1977 mgb he restored.

11. He's never late.
12. This guy can fix anything!
13. He's sexy, but no one knows that (until now).
14. He's smarter than I am, but he thinks I am smarter.
15. Never makes a mistake when he types. Amazing.

The kiss that sealed the deal. August 15, 1992.

16. He doesn't swear. Except to be funny. And then, it cracks me up!
17. He loves dogs and horses.
18. He never yells. Ever.
19. When he decides to do something, there's no stopping him.
20. He's much stronger than he looks.
21. He's kind, and he makes it look easy.
22. Football and fishing bore him.

The worker: Mr. Lucky painting his mother's house. Such a son!

23. We both love baseball.
24. When there is one chocolate left, he will leave it for me, even though I would not do this for him.
25. When he snores, it's melodic.
26. He shaves every day.
27. He doesn't ogle other women or flirt with them.
28. He's handsome.
29. He doesn't smoke, drink, or gamble.

The man of leisure: His other woman will always be his boat. I hope.

30. He has a full head of wavy hair.
31. He gave up junk food and cigarettes for me.
32. He's always there for his family, even when "there" is a two-day drive.
33. Other men respect him and seek his advice.
34. Cute buns.
35. In 20 years he has never criticized or embarrassed me. So far, so good.
36. He's incapable of lying. Not even little white lies.
37. He personifies kindness.
38. He will eat whatever I cook and serve.

The dude who makes all my dreams come true. I have to be careful what I wish for.

39. He likes going out to eat. With me.
40. He never presses his religious or political opinions on others.
42. Did I mention the buns?
43. Nothing seems to scare him. How can that be?
44. He will work harder than any one I know, and he never leaves anything unfinished.
45. He doesn't brag or boast.
46. He's efficient. Very. Opposites attract.
47. He's always polite and courteous to strangers.
48. He doesn't worry.
49. Revenge and spite are foreign concepts to him.
50. He takes good care of our money, our dog, our yard, and our cars. And me.
51. Bonus Point: He's a good kisser.

Happy Valentines Day, Honey. I love you. 

 The traveler: While we were vacationing in New Mexico last month. 

What Do Chips and Salsa Have to Do with Home Staging?

Thursday, February 10, 2011

Recently a recipe of mine was featured on Foodie-isms.com, where the tag line is "Obsessively Interested in All Things Culinary."

Stephanie, the brains behind the Foodie-ism site, writes inspiring and informative posts about cooking, nutrition and travel. She's always looking for good recipes from people who love to cook, and love to eat. Count me in.

I'm a big fan of salsa, especially ones with more flavors than just tomato and spices. Please visit Foodie-isms and see what the foodies are cooking and eating. You'll find an intriguing collection of  temptingly delish recipes contributed by cooks and chefs. If you're a foodie yourself (no credentials required), consider sending Stephanie one of your own.

My recipe includes directions for making your own homemade tortilla chips. Why make what you can easily buy, you may ask. Because once you eat your oven-baked, ultra crispy chips, you won't be happy with what comes out of a cellophane bag. You'll be spoiled good.

Sweet and Smokey Salsa

1 14 1/2-ounce can diced tomatoes, drained well
3 tablespoons minced onion
3 tablespoons minced fresh cilantro
1 tablespoon lime juice
1 teaspoon sugar
1/4 of a canned chipotle pepper in adobo sauce, chopped
½ teaspoon granulated garlic
salt to taste (optional)

Process all ingredients except salt in food processor. Add salt to taste and process again.


Oven Baked Tortilla Chips

Why would anyone bother making homemade chips? Well, just taste these. They are shatteringly crisp, fresh-tasting, and low in both salt and oil. It’s worth the work and the wait.

2 tablespoons vegetable oil
5 corn tortillas

Drizzle oil over baking sheet or jelly roll pan. Stack tortillas neatly, slice stack in half across the top, then slice each half into three wedges, to yield 6 triangle chips from each tortilla. Arrange the wedges in a single layer on the baking sheet, rubbing both sides of each wedge in oil, using the wedges to push the oil around the baking sheet. Bake in a 250 degree oven for 1 hour. They should be very crisp, but not browned.


But what do chips and salsa have to do with my on-going blog topic, staging your home for the real estate market? Not much. Honestly...I'm just trying to prove that I'm not a one-trick pony. I could invent a connection, like...once your home sells you should have a little celebration and serve this snack with those margaritas.

Or I could point out that Stephanie's motto is, “ That tastes good….but how can I make it taste even better?” That attitude is akin to the attitude an effective DIY home stager takes. "That looks good...but how can I make it look even better."

I could also say that making things yourself rather than buying off the shelf is gratifying. DIY projects can also be more specific to your needs. If you need less salt, you can have it your way, and if you want more lamps or chairs than a hired home staging service recommends, you can do it your way. That's why I encourage people to DIY home stage, even though it doesn't make me friends in the professional home stagers community.

Bon appétit!


southern hospitality

If You've Got Location, Flaunt It. Here's How.

Thursday, February 03, 2011
Do you have a home in a location that's unique? Do people buy into your area of the country, or your town, or your neighborhood, because it's special?   

When I talk about staging a home for sale, I usually advise against staging with big, in-your-face personality. But owners of homes in unique locations would miss an opportunity if they didn’t stage to emphasize the specialness. Resort properties are prime examples, but so are homes in historic or especially scenic locations.

Santa Fe, New Mexico, is a city that calls itself  "The City Unique." It deserves the title because there’s no place like it. If you ever want to be swept away to another time and place, but your passport isn’t up to date, you want to go to Santa Fe. Mr. Lucky and I have just returned from a week's vacation there. 

Through careful local planning, Santa Fe still looks a lot like the village it was 400 or more years ago. The narrow, winding roads maintain their Spanish names, and the buildings are low, with the soft contours and colors of adobe construction.

The hotel we chose is a complex of adobe-style condominiums 
in the historic downtown area. The sun is going down. 
The air is scented with the smoke of pinon pine fires burning in kiva fireplaces. 

 Our living room. A kiva fireplace is what makes a 
living room authentic in Santa Fe. If you're staging 
your home, ask yourself what's expected by 
buyers in your market and emphasize it.  

Staying in a managed condo complex means staying in a home while the owners – whoever they are – work at their desks in New York City or Los Angeles or somewhere, waiting for the time when they can spend the summer or holidays or retirement there themselves. These kinds of resort properties can be sweet deals because everything you need is there – from movies and books to coffee filters and dishes.

It was like living in a staged home. With a housekeeper who comes when we went out to eat, shop, hike, or explore. I really am Mrs. Lucky!

From the holiday season through January, buildings in Santa Fe 
display lighted luminaries. It's a perfect time to visit 
because the crowds don't come until summer.

In winter, merchants and hotels are happy to offer tourists 
real bargains. Here I am, in the mirror, 
shopping at Jackalope Pottery, full of fun imports.  


Our bedroom. Tile floors, Mexican tub chairs, lots of 
natural light, chunky furniture, and oversized 
 tapestry-covered pillows. Santa Fe has a look all its own. 

As soon as we entered our home away from home, we felt 
surrounded by the attitude of the locale. That's 
what the effect of good home staging should be! 

The kitchen featured a print from popular local 
artist R.C. Gorman. Hanging good local art is perfect for 
reminding buyers what's different about your part of the country. 

Typical Santa Fe: chili ristra hanging in an adobe wall opening. 
Whatever is indigenous to your region can become part of home staging 
that really speaks to buyers, especially ones relocating there.

Whether we're talking about food, fashion, architecture, music, crafts, art, or interior decor, Santa Fe's style is rustic and artsy, like most of the Southwest, only more authentic and at the same time, more sophisticated.

Define what the style is for your part of the country or neighborhood, and stay true to local traditions, especially when the area is unique. Like Santa Fe.

Get more tips for making your home appealing to buyers in my eBook, DIY Home Staging Tips to Sell Your Home Fast and for Top Dollar.

Popular Posts